Layaways
The Layaway routine provides a method to track items when a deposit is made to hold the items until full payment is made.
Liberty does not pay consignors for items currently on layaway. The balance only becomes payable once the layaway is completed. Liberty provides a choice as to whether or not to allow the pending credit for the item on layaway to be used for store credit purchases. This same option also controls whether or not the transaction becomes visible on the optional Consignor Login service.
SeePayout Preferences for more details.
Note The Following About Layaways:
- A deposit (or down payment) is optional.
- It is your option whether or not to make consignor credit available for store credit purchases as soon as consigned items are placed on layaway. To set this option, please see the paragraph Include Layaway Items in Total Owed in Payout Preferences.
- Receipts show Layaway information.
- Monies due to consignors for items included in a layaway are only payable upon completion of the layaway.
To Place Items On Layaway
- From the POS Hub select the New Sale button.

- Login if prompted.

Select the customer who is making the purchase. - Select the Customer button at the top of the sale window.

- Select the customer from the list, then select the OK Button.

Note: If this is a new customer, select the Add Account Button to create the account. See Add An Account Through The POS.
You will see the selected account in the POS.

- Select your posting mode. For more information on posting modes, see Sell Items For Regular Price, Sell An Item At A Percentage Discount, and Changing The Selling Price Of An Item.

The posting mode you are in will be displayed in the black entry field.

- Scan or type in your items using the Account-Item Number format.
Example: for item 19 on account 1 type in 1-19.
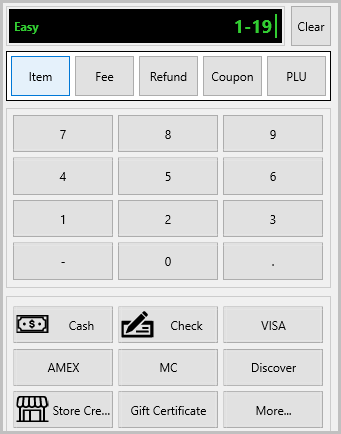
- If a deposit is to be made, enter the amount of the layaway deposit, then choose the method of payment (Cash, Check, etc.). If no deposit is to be made, skip to the Step 8.

The amount will be applied to the sale.

- Click on the Layaway button.

- Press the Print Receipt button to print a receipt.


Note: The Finish button is ONLY used when final payment is made.
To Lookup A Layaway Sale
- From the POS Hub select the Layaway Lookup button.

Login if required.
The Layaway Lookup dialog box appears.

You can use the Search field to lookup a layaway by any of the following options:
Sale #, Sale Date, Account #, First Name, Last Name, Phone #, Reward Id, Total Sale.

- On the bottom-right hand side, you can see a Preview of the content from the layaway selected.

- Select the OK button once you have selected the layaway you want to add payments to.


To Accept Subsequent Layaway Payments:
- Lookup the Layaway (see Lookup a Layaway Sale, above).

Note: On the Customer Bar on the right-hand side, above the black bar and to the left of the Edit button, you’ll see the number of layaways associated with the customer. In this example, the customer has one layaway. - Enter the amount received from the customer and select the payment method (Cash, Check, etc.).

You will see the payment applied to the sale.

- Select the Layaway button.

- Press the Print Receipt button to print a receipt.


To Accept The Final Layaway Payment:
- Lookup the Layaway (see Lookup a Layaway Sale, above).

- Enter the amount received from the customer and select the payment method (Cash, Check, etc.).

The final amount will be applied to the sale.

- Press the Finish button to complete the sale.

- Press the Print Receipt button to print a receipt.


Next Article In Section
Click the following link to move to the next article in this section:
Cancel A Layaway