Table of Contents
Placing a Watermark Image On Your Pictures iOS
- Open the Liberty Photo App on your iDevice and then Sign In.
If you are not familiar with this procedure please visit the following page:
Opening The Liberty Photo App - Tap the Three Dots menu button at the top right of the screen and then tap the Watermark settings button.
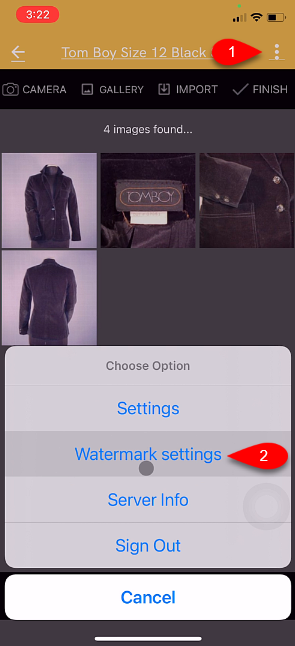
- A watermark makes an image uniquely your stores.
You have some options that you can edit for your Watermark.
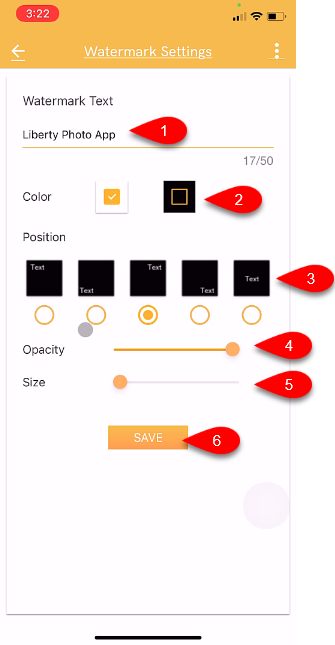
- Watermark Text: This text that you type in will appear on all of the pictures you take.
- Color: Sets if you want a border around the Watermark text.
- Position: Allows you to select what position you want the Watermark to appear at on your image.
- Opacity: Sets if you want to make the text slightly see through or solid.
- Size: Sets the size of the Watermark from Small to Large.
- Tap the Save button when you are done.


Next Article In Section
Click the following link to move to the next article in this section:
Changing Which Server You Want To Connect To iOS
Related Topics
Placing a Watermark Image On Your Pictures iOS How To Download and Setup The Liberty Photo App for iOS How To Use The Liberty Photo App for iOS Overview Opening The Liberty Photo App iOS How Use The Camera To Add Images To Items By Using Account - Item Number iOS How To Add Images To An Item Using A Barcode On The Tag iOS How To Add Images Using the Gallery Feature (From Your iDevice’s Library) iOS Using The Import Feature To Import Photos from iCloud, Dropbox or Google Drive iOS How to Edit A Photo That Is Attached To An Item iOS Editing The Settings Within Liberty Photo App iOS Changing Which Server You Want To Connect To iOS